Translate

Showing posts with label recipes. Show all posts

Monday, April 13, 2015

Easy 3 Minute Strawberry Smoothie


This smoothie is a great for "masking" the flavors of your daily extra protein powders, coconut oil, kefir, and chia seeds and stuff as it works well for masking virtually all of these things.

Grab yer blender, a few small-medium sized strawberries (leaves removed, of course), a half a banana, and some ice cubes and let me show you how I make a 3 quick 3-minute one-serving strawberry smoothie!

 First things first, my magnificent owl mug gifted to me from my equally magnificent mother. 

The owl cup, it's really a must for me, so go ahead and grab your own favorite mug before we start.

Now, the ingredients (for the exact easy smoothie like the one shown here) requires: 
3 small-medium sized strawberries 
Blender
About 4 ice cubes (or depending on how you like it)
A half a banana (or more if you like the banana flavor to be strong. I don't.)

Optional ingredients:
  • Sweetener of your choice. This is a pretty sour tart smoothie. Okay let's be honest, this baby is downright sour without sweetener! I used a tablespoon of strawberry ice cream, but vanilla works too. You can use  milk, a shot of creamer, or even honey or vanilla extract, if you prefer non-dairy.
  • Kefir

  • A teaspoon (or less if you're like me) of peanut butter
  •  A dash of orange juice for the extra Vit. C (preferably the real stuff)
 
  • A scoop of chia seeds or Mila seeds, which is what I had on-hand.
 
  • A teaspoon of coconut oil, for the extra health benefits
  • A scoop of hemp protein powder. (I used Manitoba Harvest's Hemp Pro, which I've reviewed here, if you're interested.)

  • A scoop of whey protein powder (I used Summit Nutritions' vanilla flavored pure whey protein, which I reviewed here.)


Friday, January 23, 2015

No Bake 3 Ingredient Healthy Peanut Butter & Oatmeal Bars!

Update: This peanut butter bar recipe post has received so much attention in the last weeks that I've been getting emails galore from many of you who've taken the time to share your outcome with me.

I just finished reading an email from a lovely reader named Missy saying that she made these as a last minute snack to stash in her husband's lunch box, who works as a driver for Titan because he's often on the road for long periods of time and has been trying to substitute his frequent junk food-snacking with something a bit healthier.

Missy said when he called her for their nightly "good-night call," he was raving about the new snack in his box, saying that he  could eat them all day long, "'specially since they don't make me tired" like the greasy chips and fried foods he's accustomed to.

"I'm so thrilled to have finally found a healthier snack that'll hopefully keep him from this road to diabetes. Hubby is leaving out again in the morning and has already asked when I'll be making more of the bars."

It warmed my heart to read such a positive story about something as simple as these peanut butter bars. "This time, I'll have to save myself a couple, and I'm not even a fan of peanut butter!" Missy said in her email to me. 


 I want to thank all of you (and you, Missy!) for your kind words, for sharing my post and most of all, for sharing your stories with me, like my friend Missy has. 

They really make my day.

 I will be responding to each email individually, but please be patient as I try to get each of you.

 Lately, as my exercise routine has enhanced (and hopefully, so has my muscle mass!), it seems my hunger has skyrocketed. I've been finding myself craving a little something long before dinner time, and some days, even after dinner! I haven't been staying as "full" lately as I used to, and am having sugar cravings galore.

Therefore, I decided to create a "snack" that I could eat throughout the day that's both filling and somewhat healthy.


I'm cheap. I'm easy. And I'm quick.

So I wanted a recipe to match.

I don't like to cook, I don't have much spare time on my hands to cook anything that takes longer than 10-20 minutes. I needed something that ...
1. Required little to no cooking.
2. Could pack quite a filling punch for me and my seemingly bottomless pit gut,
3. Something that required ingredients I already had on hand (what can I say, I was hungry!)
4. Something that wouldn't be too harsh on my health, and optional, but hopefully, something that I could probably make a large batch of and eat on a regular basis, whenever the breakthrough hunger or cravings strike.

I typically crave chocolate and cakes and all things sugary, but desperately want to eat healthy. So, I went in search for the quickest, tastiest, somewhat healthiest recipe I could find that only required a few ingredients, and ingredients I had on hand (which wasn't many!)

I found this very basic recipe: 3 Ingredient No Bake Peanut Butter Bars --  found on Spark People, and submitted by user LEXRAP -- and I tweaked the hell out of it until it was just what I needed. 


Let me just say, I absolutely adore these peanut butter bars. They are the perfect filling snack to not only curb my hunger and cravings, but keep me from feeling too run down while working. The omegas and protein-filled ingredients I've added make these bars great for some mid-day pep. I can eat them at all hours of the day and night, and find myself excited to eat them every time I make a new batch. And the best part, these are a total success for keeping my bouts of hunger away, day or night.


Makes 20 bars
- 1 Cup of Peanut Butter
- 3 Cups of Oats I used instant oats because it's what I had on hand.
- 1/2 Cup of Honey. If you don't have honey on hand (I ran out after making these bars 3 times in one week), then you can substitute with 2 tablespoons of milk and 1 tablespoon of brown sugar.

There's your 3 ingredients to make the no-bake peanut butter bars!


What I start off with: Oats + the peanut butter in measuring cup. Small bowl of Multi-Grain Cheerio's in a side-bowl. The Cheerio's will be crushed and later added to the mix (but you don't have to crush them, or even add them for that matter.)  


 **All the ingredients are mixed together, in no specific order. I simply heat the peanut butter with the honey, or the honey-alternative (brown sugar + milk)**


Here's my healthy additions or "tweaks" as optionals:
From left: Hemp Pro powder, Cheerio's, Peanut butter+brown sugar, milk (in Check Into Cash cup. LOL), Oats & Mila/Chia seeds

And again, so you really get the idea.
Super Close-Up of Mila + Oats
-(Optional) Hemp protein, or hemp fiber or hemp seeds. I've used all. The seeds are delicious, and they give the bars more texture.  

Adding the Hemp powder
 

-(Optional) Chia or Mila Seeds. I use Mila right now since they're small bits so they don't stick in my teeth as badly as chia, and because that's what I had on hand, but Chia seeds are just as well.

-(Optional) Cereal. Crushed up, or whole. I used old Cheerios (the kind with the 3 different flavors, including wholegrain) that just happened to be sitting around for the last month because I wanted to make a snack that was as filling (and healthy) as possible. The Mila/Chia seeds, hemp and cereal make this a more filling snack than it would've otherwise been without them. 


I chose to crush my Cheerios into smaller bits. I just prefer it that way, but you can just toss in the whole bits of cereal if you prefer. I simply place about 1/2  cup of Cheerios in a bag, then use whatever is close by to crush them into smaller bits before tossing them into the mixture and stirring things up. 
Inside the bag -- the freshly crushed Cheerios, which made for the perfect little bitty crunch and added texture!


Melt the peanut butter and honey just until smooth, either in the microwave or stove top. Give the two ingredients a stir, then fold in the oats (and crushed or whole cereal pieces). Mix ingredients together.


So golden, chewy and delicious!

Sunday, June 15, 2014

Apollo's Extra Virgin, Organic Olive Oils Review


 Apollo Extra Virgin Olive Oil -- Review

Apollo Organic Olive Oils have been touted as the all-around best oils by many, and for good reason. Being the olive oil lover that I am, when I was told about the Apollo oils, I was intrigued enough to really want to try them for myself. Thanks to the very awesome folks at Apollo, I have had the blessing/opportunity to do so!  Just reading about the great flavors of them had my mouth watering, so I'll go ahead & share my pleasure with you guys! 


Trying the Apollo olive oils, I discovered one thing quickly -- they really do live up to their hype. I was not disappointed at all. After tasting the two olive oils I've had the pleasure to try, I found myself immediately finding myself in agreement with the rest of the Apollo oil lovers:  they are by far, the most outstanding olive oils I have ever had the opportunity to put in my mouth. I would actually go so far as to call these olive oils "luxurious."

I honestly expected great quality right off with Apollo because of all the hype! I mean, people are really in love with this stuff, but I didn't imagine myself being ga-ga over it, and here I am. Right there with them.

 These oils are really an olive oil-lovers dream, and I have no doubt that they'll be appreciated by even the most luxury olive oil users. Yea, it's that delicious. But enough raving, let's get into why. Let me help you experience the taste as much as possible without actually tasting it. I'll do my best!

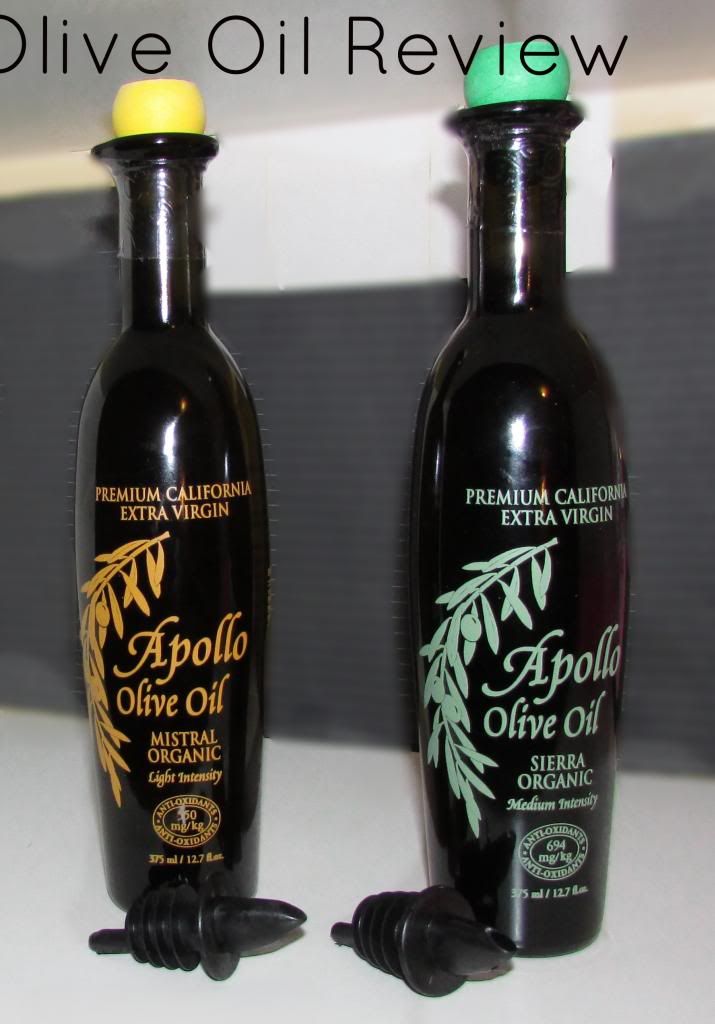
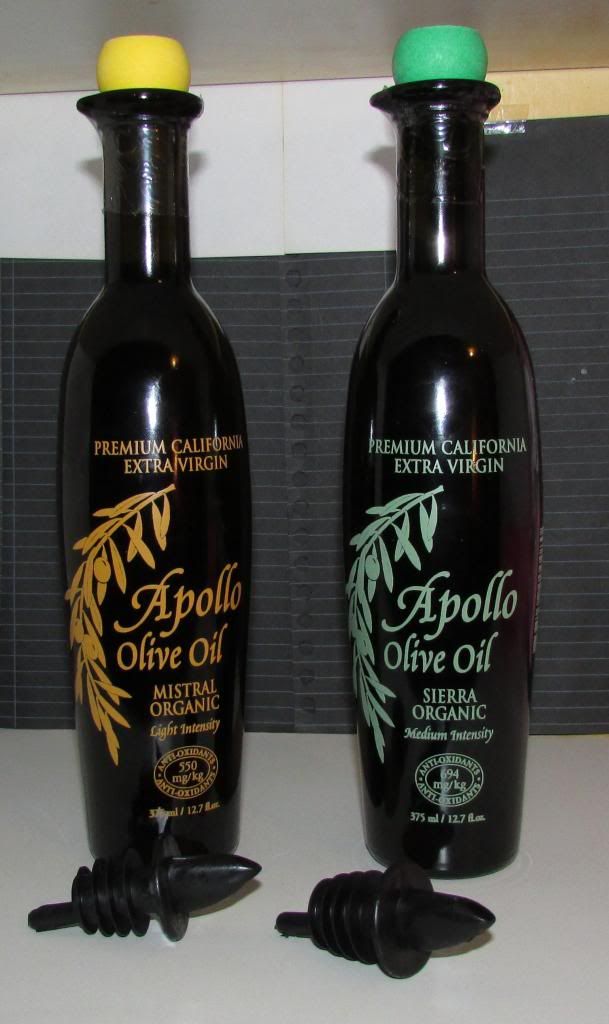
I have the two biggest sellers from Apollo -- the Mistral Organic olive oil and the Sierra Organic olive oil. Both are certified organic (by California Certified Oil Farmers) and certified virgin by the California Olive Oil Council (impressive qualities!)

Both have their own wonderful flavors and qualities, so I'm not surprised that I'm finding it tough to love one over the other.  This is somewhat dependent on the dish, really.

Firstly, Apollo olive oils were impressive right off the bat due to their being organic (truly, and with proof!) and cold-pressed. I think it's obvious why organic is so sought after (and these days it's a job to find out if your olive oil is really olive oil, much less actually organic!), but we'll discuss the importance of cold-pressed in a moment.

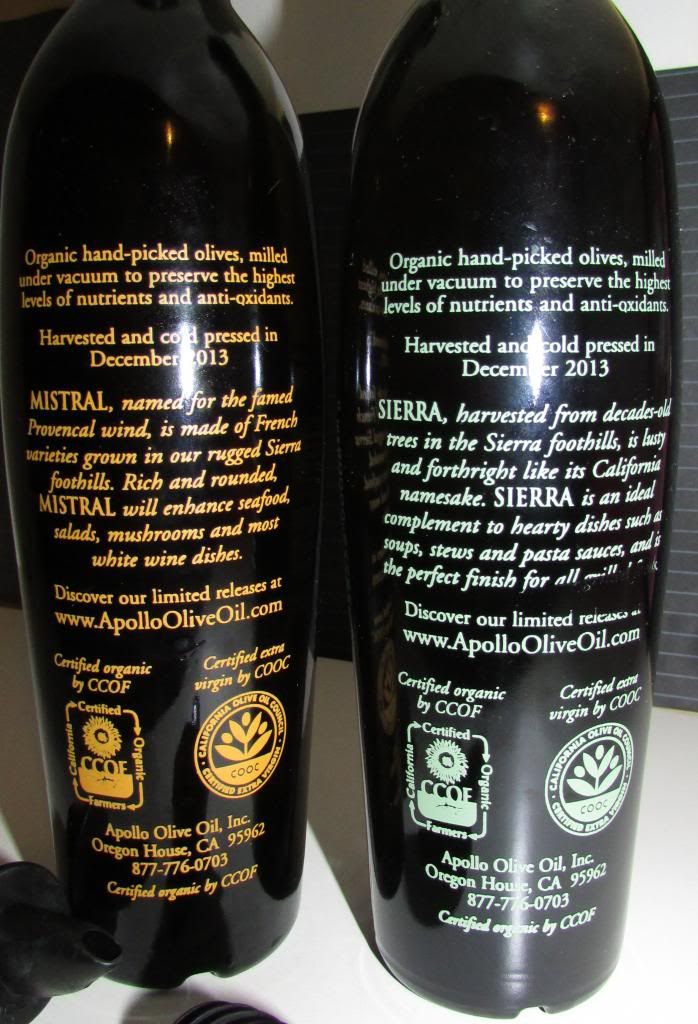
Mistral is made of french varieties grown in the rugged Sierra foothills. In fact, the Mistral oil is named "for the famed Provencal wind."

As the label says, it's "rich and rounded."

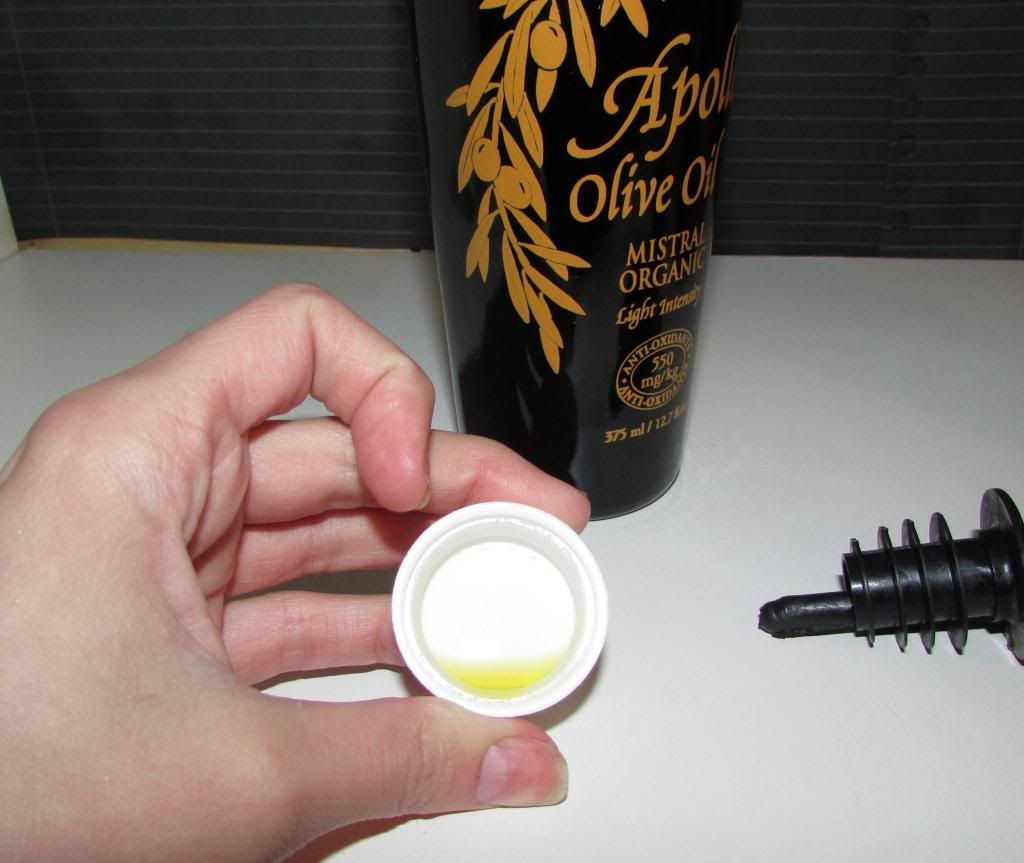
Mistral Organic is the one with the yellow coloring on the bottle. It was instant delish on my tongue upon first trying it, straight.  There was no doubt in my mind that the Mistral Organic would make any dish more pleasurable. I mean any. I enjoyed it simply by itself, for Pete's sake!  

It's the perfect salad olive oil and added something delicious to my chicken quesadilla last night!

The Mistral Olive Oil  is "light" intensity, so it's wonderfully smooth with a slight bitterness that wasn't noticeable each time I tried it, really. I love the hint of super fresh, bitter olive in my mouth, so this one is perfect in every way. It has also been described as "buttery," which I can notice when used on some foods.

Another added 'perk' I enjoy from Apollo Olive Oil is that they include, on the back of the bottle certain dishes the type of oil are most complimentary with. For instance, Mistral says that it enhances most seafood, mushrooms, salads and most white wine dishes. I cannot say much about seafood with olive oil because I'm not a fan, so I obviously don't love it, even with any oils. Either way, I couldn't imagine a seafood lover not loving the taste of their seafood combined with Mistral Organic.


Sierra Extra Virgin Organic Olive Oil

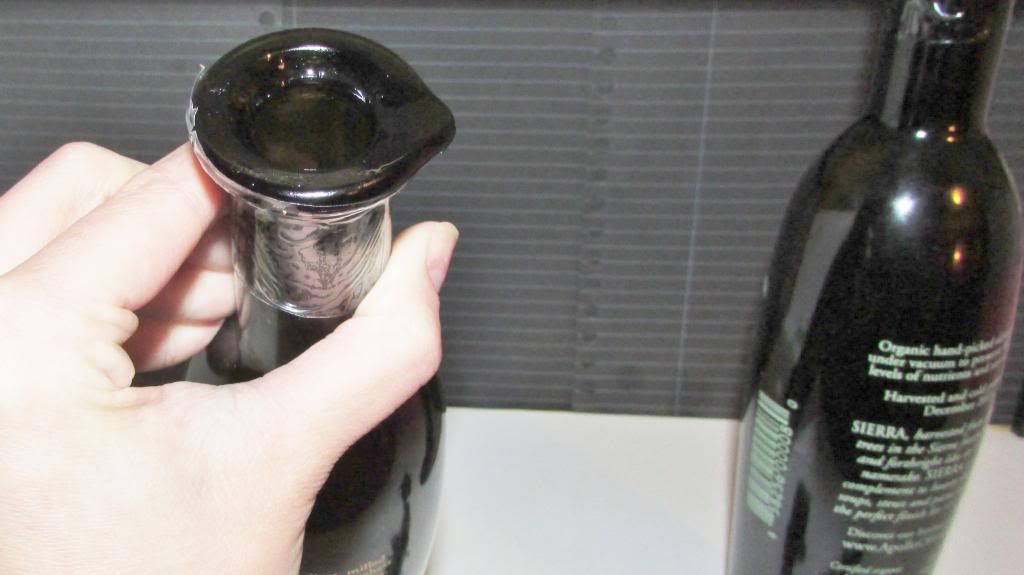
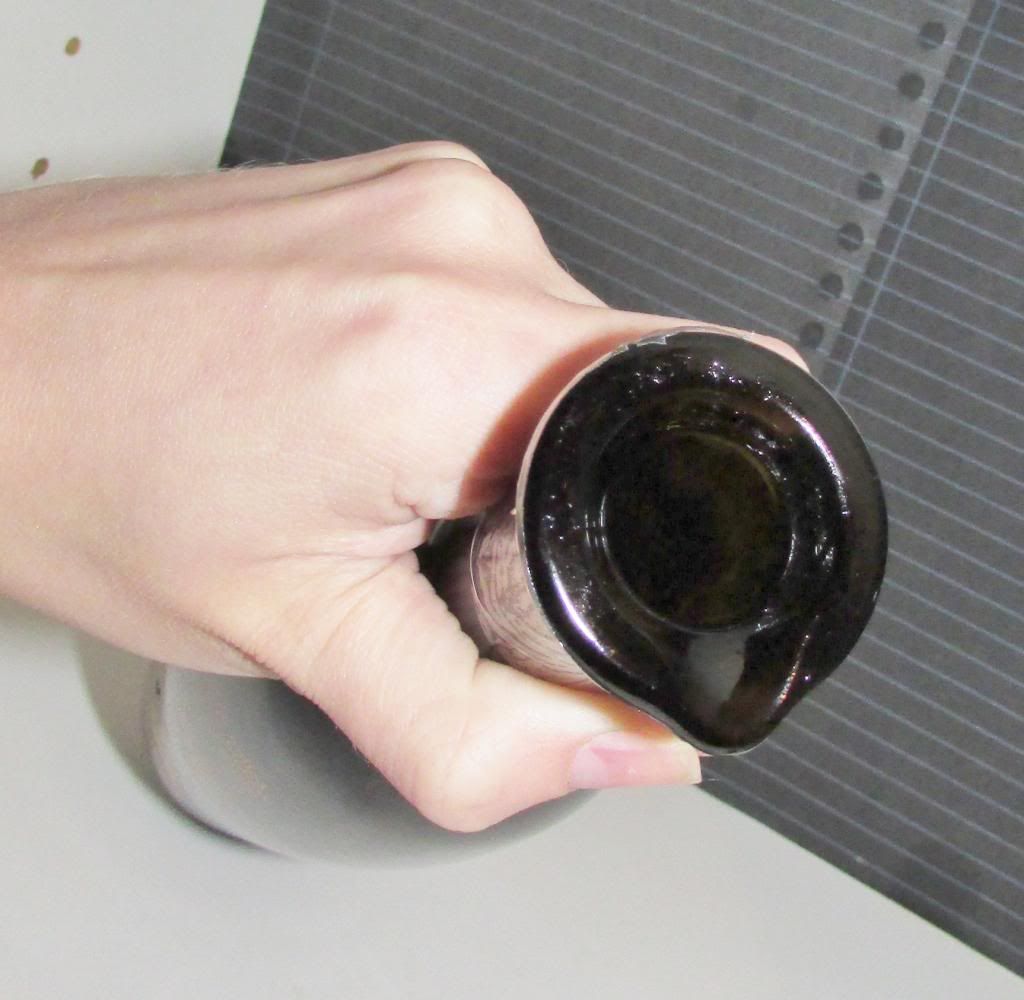
Note the little pour-spout on the bottle lip.

Sierra Extra Virgin  

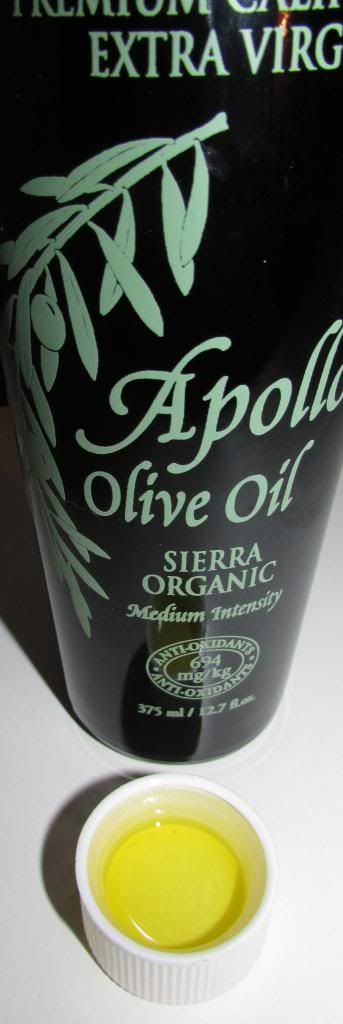
Organic olive oil -- the one with the green text on its bottle -- is more bitter than the Mistral. To me, it also has a more intense "green" & somewhat grassy taste (labeled "medium intensity), which brings an incredible amount of freshness to any dish. Along with some bitterness, Sierra also has a slight spice flavor to it, to me. This is not intense like other oils I've tried, though, and I prefer it to be subtle spicy and not intensely spicy.

The Sierra Oil is harvested from "decades old trees in the Sierra foothills."

I think the greenness in the Sierra olive oil's taste compliments most herbs, too, especially when used in a chip dip. I also adore the Sierra Oil for steamed vegetables -- really brings out some flavor in vegetables that were otherwise quite bland (greens, especially.)

Just as the Mistral bottle, the Sierra has a list of dishes that the oil compliments well. I love that because it gives you a good idea of what kind of oil you'd "need," depending on your style of food. Sierra says it's great with "hearty dishes" like soups, stew & pasta sauces.

Both Sierra & Mistral Olive Oils are very fragrant/aromatic.


My Favorites Apollo Olive Oil Recipes So Far:
Personally, one of my favorite ways to have the Sierra Olive Oil so far have been on meat. Add some herbs and holy heavenly taste-buds! 

 I adored the flavor of Sierra on steak and pork, and even grilled chicken (with garlic, a sprig from my fresh mint plants, and herbs like parsley, rosemary, etc.). It added the perfect helper to the dryness of the chicken, plus a very welcomed flavor boost.


Oh, Oh, Oh! Can't forget bread! These two olive oils are the best bread dips I have ever tasted & I've been known to really get down with some bread and olive oil dips! Herbs like parsley, oregano, some garlic, rosemary and a sprig from my mint plant -- all tossed in a dish with either of these oils made my night. 

In fact, I'm afraid this simple way of eating olive oil has ruined me for the rest of the measly oils in the world. I've had some great ones, and haven't ever met a quality olive oil/herb bread dip that I didn't adore, but there was nothing quite like it with the Apollo oils.

 I had to have a dip of both oils -- the Mistral (with added herbs to the oil) and one dish for dipping with the Sierra. I just kept going back and forth dipping one piece in Sierra, the next bite in Mistral!

 I even had Mistral with baked little red-skin potatoes, green peppers and thought it was amazing! I even loved corn on the cob smothered in the Mistral Organic oil.  I could literally have this stuff every day (probably on almost every food) and never get tired of it.  

Meredith's Sauce Gremolata found on the Apollo website will be our next try! It sounds perfect and only requires a few, easily found ingredients! I love when I can make a recipe easily, especially if the ingredients are already in the kitchen. This recipe, consisting of only lemon, Mistral, garlic and parsley is absolutely perfect! Plus, I can already almost taste the delicious-ness of those ingredients together.


B will be trying the Mistral grilled cheese recipe. We couldn't think of a dish he'd adore, so when I checked the Apollo website and seen grilled cheese as an option, I just knew that'd be his pick.

Either of the oils (added herbs just like with the bread dip) make a delicious snack with baked tortillas or tortilla chips. One of my absolute all time favorites. 

So, far, I've been using the Apollo Olive Oils on a different dish each night (sometimes more than one!) and have yet to not love whatever I've eaten it with, so this is some truly fabulous oil.


 Fantastic recipes using the fabulous Apollo Olive Oils can be found here.


 Reasons to Fall in Love with Apollo Olive Oils:
  • - Certified organic.
  • - Cold-pressed.
  • - Amazing, delectable, unique flavors.
  • - Olives are organic and hand-picked.
  • - Olives are milled under vacuum to preserve highest nutrient & antioxidant levels. Milled under vacuum ensures higher polyphenol content. An interesting tid-bit: The mill used by Apollo is one of only 5 in the world!

You can even read about Apollo's entire milling process here. Awesome, huh?
  • -Apollo Oils even have the date they were cold-pressed on the bottle! For example, the 2 I have says it was cold pressed in December 2013, which means this stuff is nice & fresh! Not old and stale and of lesser quality.

More pros include the dark glass bottle (important for good olive oil) and the oils came with a nice removable spout for pouring. Heck, the bottles themselves even have a little pour-spout (see photos) at the edge/lip, which prevents it from being so messy.


 Health Benefits of Olive Oil:
Olive oil is high in antioxidants and polyphenols, rich in essential fatty acids, vitamins and minerals -- if it's quality oil. Apollo Olive Oil says on the label that their olives contain a high content of both antioxidants and polyphenols.


Polyphenols help your memory stay sharp, minimizes risks for cardiovascular disease, reduce inflammation.

Polyphenols slow bone loss, which is a big plus for me!  Etc.

Antioxidants are anti-aging, they neutralize free radicals and help prevent damage (like that associated with cancer) from free radicals.

 Free radicals are a known contributor to health problems like: muscle and tissue degeneration, heart disease, diabetes, cancer, etc. See how important antioxidants are now?

They also help prevent Cognitive impairment
Immune dysfunction
Cataracts
Macular degeneration
Alzheimer's
Antioxidants may even increase longevity and decrease oxidative stress.

Olive oil also helps reduce risk of gastric ulcers.


Other Olive Oil Remedies:
  • Removes earwax build-up! Simply use a dropper to insert the oil into ear canals. I've used this (and coconut oil) to successfully, safely and natural (isn't that the best!) cure ear mites in my pets!
  • Helpful for virtually all skin conditions (eczema, psoriasis, cracked skin, diaper rash, any dry-skin condition, etc.) Also helpful for some skin infections.
  •  Olive oil has been known to help with symptoms of IBS and candidiasis, which most of you know I suffered from severely.  It helps with constipation, inflammation of the digestive system, etc.
  • Olive oil is used in the Hulda Clark parasitic cleanse protocol for tapeworms.

  • Can't forget oil-pulling! Olive oil is one of my two favorite oils (and coconut) for oil-pulling, and I've discussed that a lot here, in other posts. Since Apollo oils are cold-pressed, organic and such high quality, they would be ideal for oil pulling. But I've yet to be able to bring myself to use it and spit it out, so oil-pulling with it will be something I might try eventually, but as for now, I'll stick with eating it.


 What's Considered "Quality" Olive Oil & What to Look For

Equally as important as taste, also nutritition of an olive oil is of great importance to me (and most olive oil-lovers.) That is why I was impressed with all the wonderful qualitites of the Apollo Olive Oils (all listed below). I checked into Apollo Olive Oils and was most impressed that they met the "checklist" that many olive-oil lovers look for in an olive oil.

For the sake of giving my readers virtually everything they need to know about a product, I feel obligated to also shell out knowledge on quality and what you should look for in a product I'm reviewing. So, below we'll discuss what quality olive oil is, what to look for and what you should be wary of, or look out for when shopping for olive oil.

Just like when you shop for the perfect supplements and vitamins, when you're going for olive oil, you also have a checklist of important things to look for (and look out for, for that matter.) I say this because the olive oil "industry" made the news not that long ago for the now well-known olive oil scams happening.


To be brief about that, basically, a lot of the olive oils (especially some of the top sellers in grocery stores) were put through a test of some sort and so many had failed to such an extent that the news article deemed them not even able to be considered olive oil!

So, unfortunately, olive oil is yet another thing we consumers have to look closely into before shelling out $. You want to be sure you're getting actual olive oil, and if you're like me, you want to be sure you're getting the best quality out there. There are several "factors" to findnig the "best quality."  You want cold-pressed, extra virgin and certified organic -- Apollo oils are both. It also doesn't hurt to go the extra mile and find out where your olives were from.

Why Cold-Pressed?

Cold-pressed means it was pressed using the lowest heat possible, to extract the oil. Heat destroys a lot of the nutrition in olive oil, and often means chemicals and other icky things are involved in the process. The natural ingredients and their nutritious content isn't sacrificed from heat, chemicals etc. that come with some methods other than cold-pressed.

Cold-pressed oils retain their high antioxidant content and it means the oil you're consuming doesn't contain any chemical solvents nor has it been bleached and deodorized, which is what happens when oil is mechanically pressed.  

To put it in a list, here's what you should look for:
 
1. Certified organic.
2. Cold-pressed.
3. Virgin 
Image source: Image Source: http://www.theyumyum.net/2012/07/weekly-meme.html
4. Bonus: Find out where the olives came from.


 Olive Oil For Beauty


 To really put the icing on the cake (or should I say the olive oil on the potatoes?), here are some olive oil beauty benefits, too.

I love olive oil not only for its amazing ability to make food taste like heaven, but also because of its mind-blowing health benefits. The health benefits were the first reason I ever got into using olive oil in the first place. There are so many! It's rich in Vitamin A, E. High in antioxidants, polyphenols, essential fatty acids, minerals, etc.
Olive oil was even said to have been a Queen's  "secret to beauty." 

Yep, just olive oil!
(Can't find her name, or the source I read that from years ago, sorry!)

It has been said that using it internally and externally (like on your skin) is one of the best ways to "beautify" your skin. It both nourishes and protects skin.
  
 A long time ago, I took the challenge to begin using olive oil on my skin. Some of you may even remember me posting about that. I still do.

 I find it to be the best, most effective way for moisturizing dry skin, having a healthy complexion, etc. Plus, using it internally is one way to fight wrinkles and have good skin, so applying it externally likely has the benefits, too.

Olive oil's uses are quite endless for beauty, health and taste! It can be used on hair for shine, overall health and as a hot oil treatment.

It strengthens nails, nourishes cuticles, chapped lips and even feet. Simply add olive oil in bath water to soften (and promote healing!) for all over.

I've used olive oil for all the above, but one area I'm religious is cleansing my face. It has been my go-to as a facial cleanser (once a week,) and makeup remover for a few years now. I use it every morning! Works better than anything.


The Apollo Oils are so amazing, from the fragrance to the taste that I could bathe in them. That could get costly, though.


Please share in the comments  below what  some of your favorite ways to use olive oil are? Any favorite dishes?  Favorite brand of olive oil? I'd love to hear your thoughts!

 Disclaimer (I know, I hate them, too, but these days you kind of can't afford to note post them.):

I am not a specialist or any other kind of doctor or expert. Content on this blog is not intended to be taken as medical advice, diagnosis, treatment or advice of any sort. I'm simply sharing information about my own experiences and results from use of a product or activity in hopes of providing useful information/suggestions to readers, not to be taken as a patient/medical adviser relationship. I am not responsible for what readers choose to do after viewing the content here. Furthermore, I do not hold an "exceptional" or other special relationship with the company mentioned. I'm simply a consumer who worked with the company on a review that is in compliance with FTTC's guidelines. That means, everything you read here is my own words, not anything of the company's. I was not provided with monetary compensation for my review. All information posted has been done so with complete honesty. No action should be taken based solely on the content of this publication ( I'm not responsible.) Readers who rely on the information in this blog to replace the advise of an appropriate health care provider assume all risks of such behavior.

Thursday, April 4, 2013

Just Almonds -- Almond Flour and Sugar Cookie Recipe


Just Almonds sell almonds with no preservatives or artificial flavors, they're gluten-free, kosher certified, freshness guaranteed almonds. All of their almond products are 100% natural California almonds, or made from 100% natural California almonds if it's the Almond Meal or Almond Flour.

The bag of almonds shown above are also from Just Almonds, the Almond Flour is shown and discussed below. Their almonds are very delicious. Some people use almonds and blend them to make their own almond flour, so you can do that if you really wanted to do it for the experiment, but you can make it easier and just buy the almond flour from Just Almonds. I love almonds and eat a handful here and there frequently. They're one of my favorite snacks. I took some of the almonds from the bag and put them in the oven (on 350) for a few minutes since they taste delicious that way too. 


What is Almond Meal? 
Almond Meal is ground up almonds (Just Almonds grounds to the finest grain possible). What you see here in my photos is the Almond Flour. 

Photo of the almond flour, straight from the package.


What is it used for?
Baking of course. But also for other cooking and even for nut butter! You can use Almond Meal (or the Almond Flour, which I'll explain the differences very shortly) in place of regular corn meal to bake with. Almonds have great nutritious value, so when you are consuming them (in ground up, powdery form or as whole pieces) you're getting the health benefits & nutrition that almonds offer. Some people use it for increased flavor, nutrition benefits, taste and even so they know they're using a safe, non-chemically-infused product to bake with and such (since many of the corn meals and stuff available contain chemicals and other harmful preservatives.)


What's the difference between Almond Meal and Almond Flour?


 Just Almonds has both Almond Meal and Almond Flour. The difference is that Almond Meal is ground with the skin and Almond Flour is ground without the skin, which means it'll be white in color. Personally, the skin does not affect how I look at the quality of a product.  I ain't bothered by a little color in my foods, so it's not important to me, but it may be to you. 
Despite those uses for Almond Flour and Almond Meal, there are people (ahem me!) who take an interest in using the product for health reasons! Here I go. You know when I get on a health talkin' kick I don't shut up, so bear with me while  I try and briefly get to the point. I'll list some of the health reasons for using Almond Meal and/or Almond Flour (this part excites me):

- Many people use Almond Meal/Almond Flour for their wheat allergies, Celiac disease, Crohn's disease, IBS (that's me!), and other gluten-free diets. 

See! I told you I'd be brief.

Not so fast though.


Besides being great for those like me with conditions that tend to flare up with certain foods (which I definitely have gained some serious healing in this area since I started making such huge changes), almonds also contain essential fatty acids, which are more important than you might think! I just recently learned how important myself.


Almond Flour has a consistency similar to corn meal rather than wheat flour. 
Almond Flour is great for people who are watching their glycemic index as well as other health-conscious, almond-lovin' folks! 

-Low in carbs and sugars.
-High in protein.


Uses of almond flour and almond meal
Almond flour is good in "quick-bread" type recipes, like muffins, nut breads, and pancakes.  It's not good for foods such as bread that require a real dough (you can't knead it). Usually, more eggs are required when baking with almond meal to provide more structure.

P.S. Just Almonds does recommend keeping the Almond Flour/Meal refrigerated. 


And now I'm going to show you what I made with the almond flour! I'll also list the recipe and give exact instructions of how I went about this. 

Sugar Cookies from Almond Flour! (Otherwise known as some of the best tasting sugar cookies ever!)

Since I'm a very new cook and know very little, and because I had very little ingredients, I figured a simple sugar cookie would be my best bet to start off with rather than trying to make something more complicated. I did have to improvise mostly because after getting all my ingredients ready, I spent 30 minutes tearing the kitchen apart looking for the non-existant mixer. Lovely. It seems someone has stolen our mixer! So thankfully, I had my lovie on hand who was happy to put his mixing skills to use. He's good with his hands and is used to mixing paint almost daily, so he can almost double as a mixer. Moving on...

Ingredients I used:
1 teaspoon baking soda.
1 teaspoon flour. (I'd figured the almond flour would be a replacement for flour, but upon looking through different recipes for sugar cookies, it seemed I either needed to add a bit of flour to help it rise or find baking powder. That was where I got confused. I didn't know there was a difference between baking soda and baking powder and all the recipes I found called for both! So I was told I could add a teaspoon of all purpose flour to compensate.)
1 teaspoon of vanilla extract.
Half a cup of butter (softened.)
1 cup white sugar.
1 egg.
1 teaspoon of salt.

*You'll also need a mixer. Like I said, I went looking for mine only to realize it was gone (ahem, stolen), so Brozon done the mixing by hand. This will cause the cookies to be kind of crunchy -- sort of like when you drink coffee or something with sugar and it isn't fully dissolved so you have the crunchy sugar granules. This wasn't a problem for us as we don't mind some crunchy. Plus, the cookies still turned out delicious.

*Of course nuts or other things are optional. We stuck with simple sugar cookies, no extras. While mixing everything up though, I realized you could even add a tablespoon or so of peanut butter for peanut butter cookies! 


Instructions I went by:

1. Stir flour, baking soda and baking powder in one bowl. Set aside. Remember, I didn't have baking powder, only baking soda, so I used a teaspoon of flour (all-purpose) to compensate.

2. "Cream" together butter and sugar until smooth. "Cream" apparently means use a mixer. Again, mine was missing, so Brozon did it by hand.

3.   Beat in the eggs and vanilla. Gradually blend the ingredients.

4. Roll tablespoons of dough into balls, place on cookie sheet and into the oven. 

5. Bake on 350 for 8-10 minutes.

Ingredients mixed


Here's where ended up needing to improvise, once again. You can't use your hands like you normally would to roll balls of dough, so you dip them out by the spoon. I did that and put it in a pan, then in the oven. After a few minutes, I checked them and they'd turned into one big cake! No big deal since we weren't going for looks or anything.

After a couple more minutes though, it was turning into a very thin layer of my ingredients in the pan. I didn't like that, and worried since the top of the "cake" was turning brown quickly and the inner part was still very runny/liquidy,  so about 6 minutes into baking, I turned down the heat to 315 and began scraping the dough all to one side. That worked out much nicer for me because after 8 minutes, they were turning out better -- not liquidy on the middle and brown on top. I was worried the top would burn too.

After 9 minutes of baking, I started dipping out the mixture onto tin foil and rolling into balls -- well, close to balls. They're a little mishaped, but again, looks aren't a big deal since it's my first time.

Then we actually had cookies instead of a cake! The top layer that had been browning was a bit crunchy and the middle was left slightly chewy, which is my favorite. However, you can always stick em' back in the oven for a minute if you didn't want them to be chewy at all.

Here are the photos of how they turned out:


You can tell I really haven't worried about cooking pretty, by the looks of both the cookies and the pan! But who cares about beauty when something tastes so delicious? I'm sure you more experienced bakers could do much nicer work, but this is how it came out for me, and I wanted to share that. I know, I got picture-happy, but I couldn't resist!


 I definitely recommend trying sugar cookies made with almond flour! They're some of the most delicious cookies I've ever tasted. The almond flour sort of gives them a nutty taste, which is unique compared to your typical sugar cookie.


As you might have guessed, Just Almonds does sell other almond products like... Almonds! Aha! Did you guess that? I happen to have some of Just Almonds' almonds too (that's tough to say out loud!) 

If you look at my earlier, top photo of the Almond Flour, you'll see the package it comes in -- a sealed (re-sealable) bag. The almonds themselves come in the same type of bag and each have a nutrition label on the back, as well as package date and expiry date (both my flour and almonds say packaged Feb. 2013 and Expires: Feb. 2013.)

A note from Just Almonds' website:

"All of our products are shipped from the current crop and ship directly from the farm without repackaging the product or mixing it with other types of nuts (peanuts for example)."


And ...
"Our ranch is located in the heart of the Central Valley of California, and our almonds ship straight from our ranch. We take great pride in offering the highest quality California almonds and the friendliest customer service."

Recipes
You can find tons of wonderful recipes for using Almond Flour/Meal on Just Almonds website. P.S. I definitely recommend looking at the Almond Butter recipe! If you want to look at their recipes, here's the link. The Almond Butter is super easy to make, requires very little to nothing extra (besides almonds of course! And blender or food processor.) My partner and I have been really interested in making and trying the Almond Butter, so we had to try that one first. That is what I did since I'm not creative where baking is concerned & I decided to make...