My Hand-Made Jewelry Collection:
**I try to leave a brief "tutorial" on each piece I make, so if ya'll ever need help or have questions or want to request a specific tutorial, don't hesitate to message me. It'd be my pleasure! Follow me on Pinterest for quicker updates, babes!
**I try to leave a brief "tutorial" on each piece I make, so if ya'll ever need help or have questions or want to request a specific tutorial, don't hesitate to message me. It'd be my pleasure! Follow me on Pinterest for quicker updates, babes!
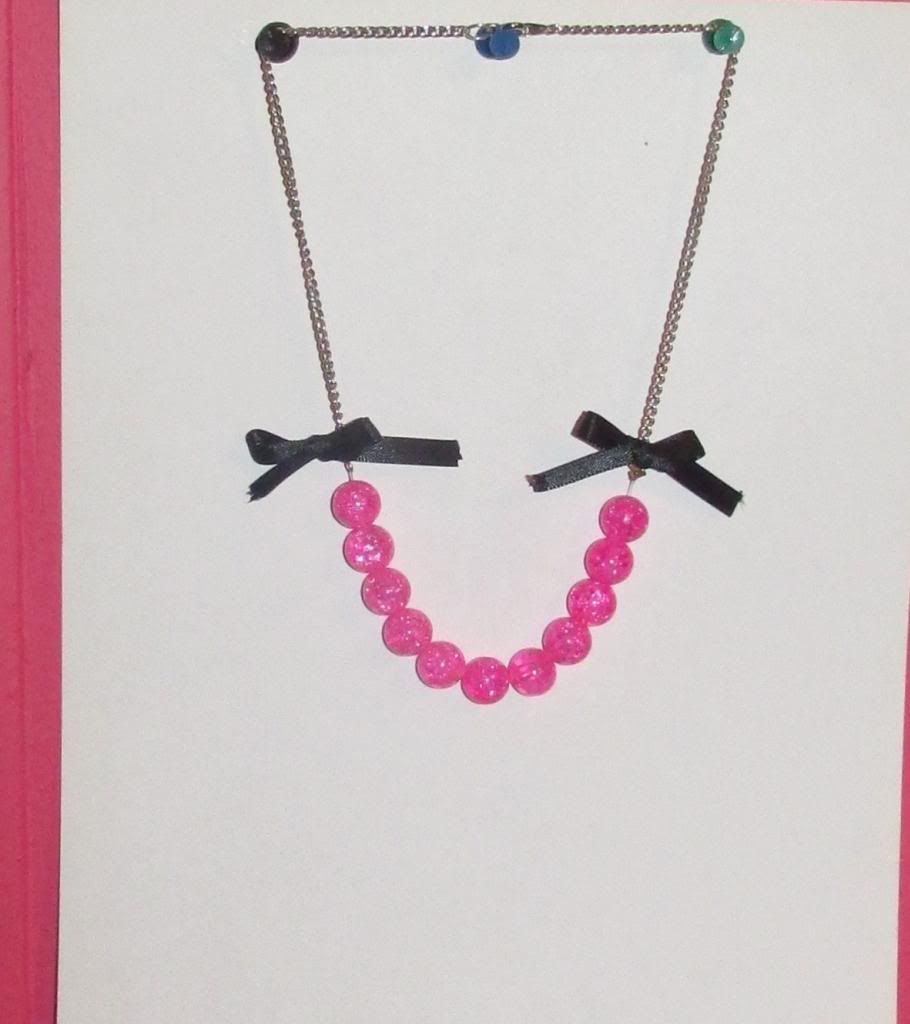
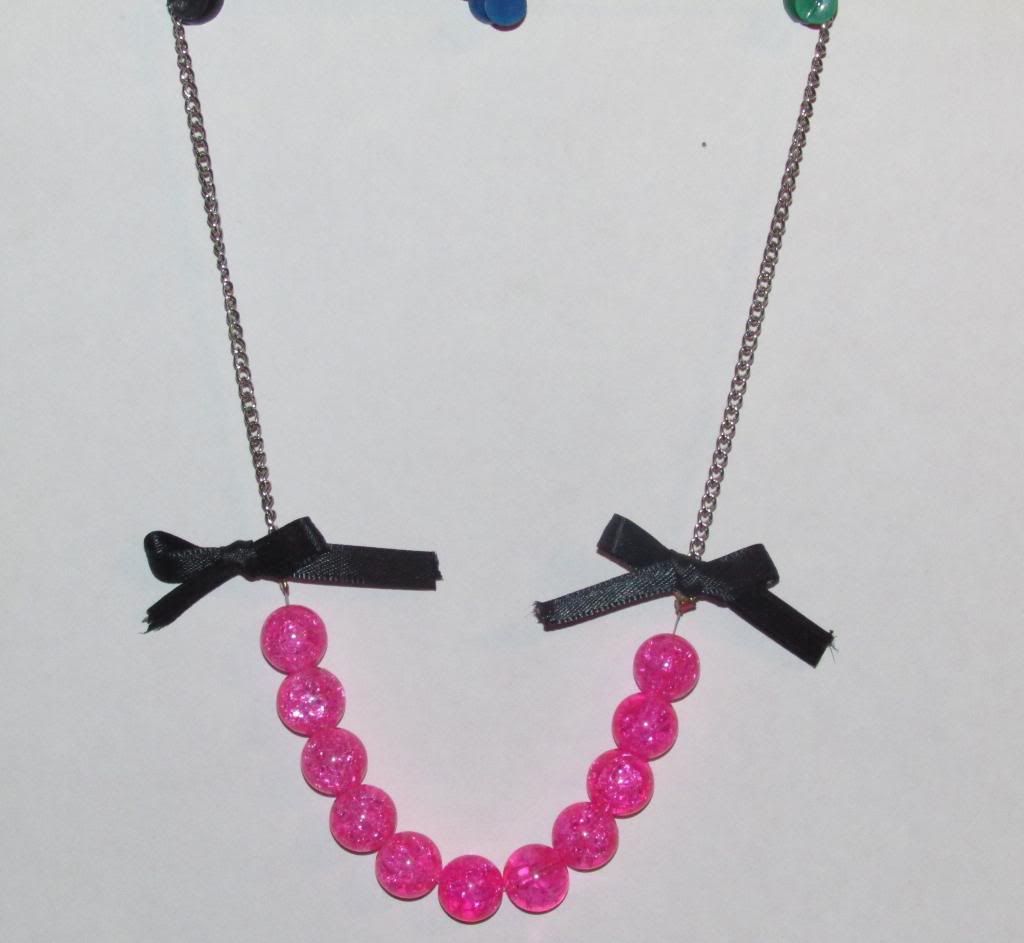
- Chain I had in my chain slot of my bead stash. Not sure where it's from or anything. I just add all my chains to a slot and use as needed.
- Black ribbon.
-Clasps, although if you make the length long enough to fit over your head, you won't necessarily need a clasp.
- 11-12 leftover hot pink, crackle glass beads from a strand I bought from Wal-Mart. Pretty sure it came with two strands.
-2 Crimp beads. I bought a pack of mine from Joann because that's where I found them cheapest (around $2, I think.)
-2 O-rings. Also got a pack from Joann for very cheap (a bit over $1, I think.)
- Fishing wire. You can find a whole roll (which is enough fishing wire to last you for at least an entire year's long of jewelry makin'!) for around $3! This is my favorite kind of string to work with jewelry-wise because it's so sturdy, clear so if your string will be showing or your beads are clear, the string doesn't stand out. Also because it's much cheaper than if you bought the clear string like this in the craft department, although it looks to be fishing wire, they still price it higher for a far smaller amount in the craft dept. But moving on...
Detailed Instructions
You can probably look at this and tell exactly how to make your own, but just in case I'll brief you:
1. Get desired amount of chain. I measure this out by taking the chain and wrapping it around the back of my neck and cutting it to where it'll meet right under my collar bones. I cut the chain this length, but you can cut as long/short as you wish. I like it this way because only some of the chain shows and the middle area is all pink, medium-sized bauble-y beads!
2. String the beads onto fishing wire (desired length) and at each end of the string, add a crimp bead.
3. Add an O-ring on the end of each chain piece -- right above the black bows. Tie the string on the O-rings (both sides) and do so tightly as possible. Fishing wire ties come loose if you aren't careful. I like to use two pliers -- one in each hand -- to grasp the end of the string and above the knot and pull tightly. This does the trick. Don't fret if your knots aren't as sturdy as you'd like because the crimp beads will provide extra protection.
4. Now, slide your crimp beads to the end, right on top of your fishing wire knots and use pliers to squeeze em' shut!
5. I made my own little bows from black ribbon to add some spunk to this necklace. If you'd like to do so, cut the ribbon to desired length. I probably used nearly 2" per bow. Cut two pieces if you want two bows, like mine. I tied my bows straight to the O-rings, so they don't flop around or turn around.
Make the bows. Use a stitch, super glue or finger nail glue (or something else) to hold the bow together. A good method is using a threaded needle through the middle of the bow, going all the way through to the back and knotting. For this necklace, I used a dab of glue and tipped the bows' ends with clear nail polish so they don't unravel or fray.
P.S. My bows took some work because the last one didn't match the first. Since I'm sloppy and didn't care to make it 100% perfect, once I got them even enough to please me, I was done. However, if you're a perfectionist and get frustrated with the two bows, this tutorial (making bows perfectly using a fork) might help. I don't know that it will as I've never tried this method, but definitely plan to because I'll eventually need to make perfect bows. I even pinned this tutorial on my Pinterest board, which you guys should so come follow! I post all the arts/crafts and stuff there to keep up with my projects and To-do's.
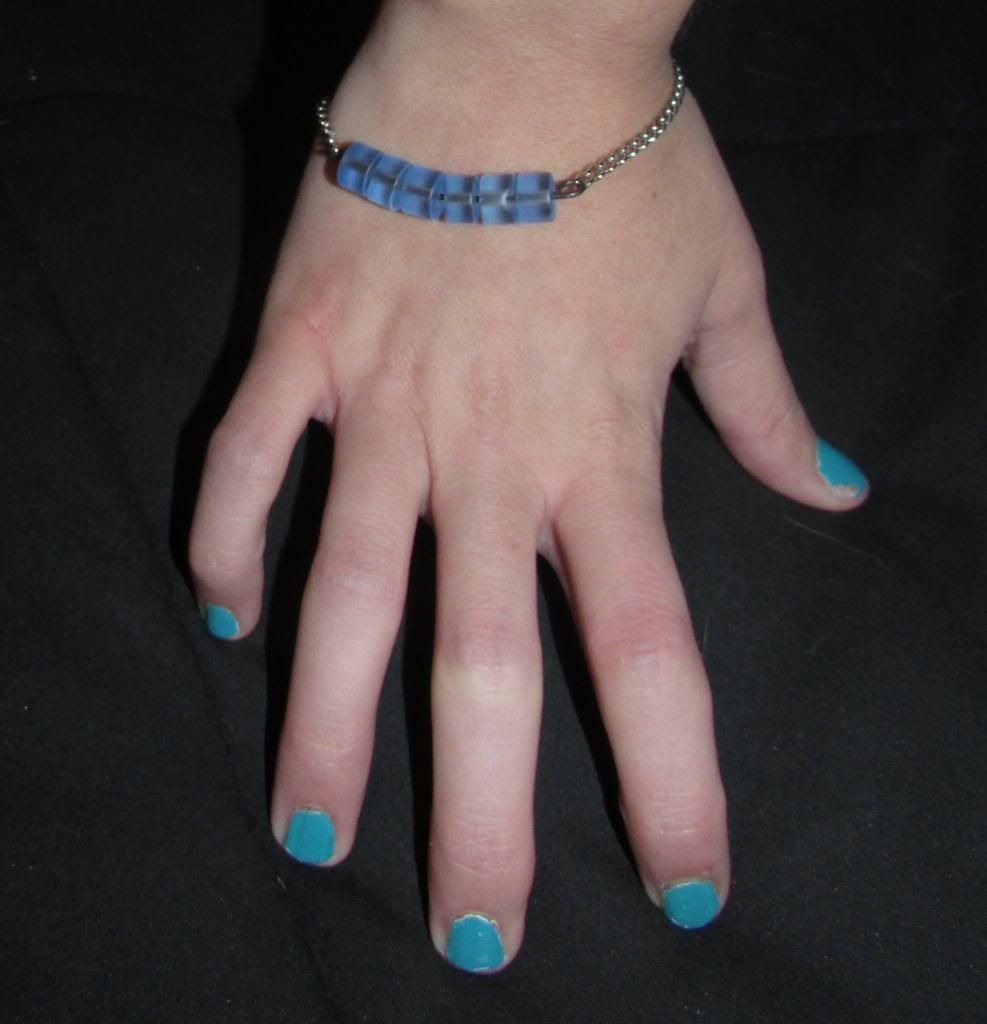
Blue Statement Bracelet (Quick, Easy Project)
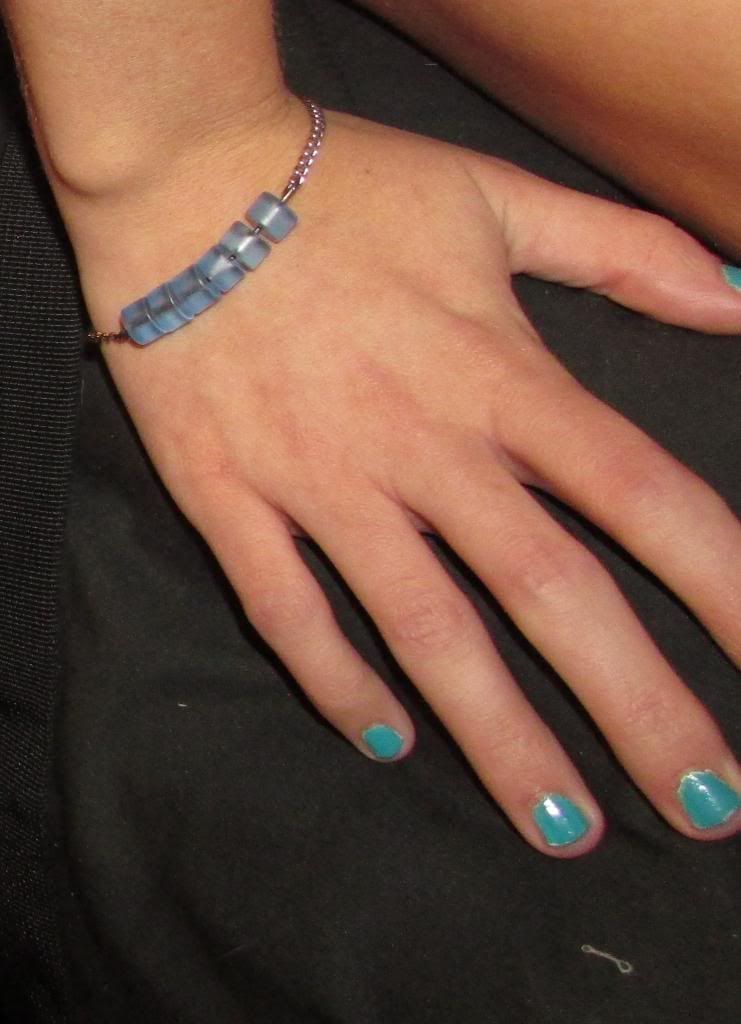
This bracelet was made using:
- 6 round, flat-sided glass blue beads. They're kind of a frosty color, if you can tell. I wish I could tell you guys where these exact ones came from, but I've not clue as my lovie surprised me with a pack of them. However, I found some similar ones here, which come in a more beautiful deep blue color. They also look like they come in a frosted clear and green too! Perhaps I'll have to put those on my to-buy list as well. I just love unordinarily shaped beads.
P.S. I had some very similar beads to this in a green color (tutorial and photos if you scroll down) that I used this same technique for a necklace. I got the green ones from a pack of $2 glass beads at Wal-Mart. A great deal. Came with enough beads for a long necklace.
- About 2" of steal annealed wire, which I bought about 7 months ago on Amazon & it came lookin' like a Slinky. Remember those things? Anyways, I paid around $5 for it, but it has been totally worth it! It's sturdier than the earring wires used to make dangly earrings and items like this bracelet. Plus, I can do all sorts of fun wire-y stuff. Anyways, though. If you don't have wire, one of those earring making "sticks" will work.
- Leftover chain. Not sure what kind or where it came from. I just dump all my chains into a slot in my beading box. Just choose chain that you like and don't worry about the length being too long because you snip it to fit! P.S. I can tell you that if you don't mind the super high-quality stuff, you can buy very long packs of chain (of all colors!) at Joann or Wal-Mart for around $2 each. I bought like a 10 foot long black, matte chain from Joann for $1 and to put my super long owl charm on. The darn owl came on a necklace my lovie bought & surprised me with on our last Panama vacation. Paid $30 for it and the day he bought it, the chain broke! I did a quick fix for it, but it soon began turning to a bronze rather than silver and started smelling badly! Weird. So, that lead me to buying the black chain from Joann, which matched my owl's eyes wonderfully, gave it a "chic" look I guess you'd say and I had tons left over. That could be a pointless story I just told because I did not even use that leftover black chain in this project, but now you know where to buy chain for cheap. Moving on.
-You'll likely need a clasp. I use these cheap ones I bought (like 50 per pack) from Joann for around $2. It's what I use on almost all my projects requiring a clasp. P.S. If you like lobster clasps, Wal-Mart kid's craft section is where it's at, friend. I'm not even joking. They're thick, sturdy and amazing! I'll admit, these clasps from Joann (don't remember the brand, but it was the cheapest one) have had a few in the pack that were broken. So you'll see a pretty awesome sized pack of lobster clasps at Wal-Mart in the kid's craft section in a pink plastic, resealable bag. Don't know for sure the price -- I think less than $4-$5 -- but I tell you, those were some of the best clasps I've ever used. Okay, moving on. Again.
P.S. If you have no clasps, but do have some wire -- you can create your own easy clasp! They're beautiful too. It may not match your chain though. There's a tutorial on how to make your own clasp here. I love those! What a beautiful job and they'd be a cheap, quick and easy way to do up a bracelet. Plus, those add a nice touch to a plain ol' clasp. There are loads of other DIY clasps, so do a search if you want more choices.
Brief instructions:
This bracelet probably speaks for itself in terms of how to construct it, but just in case...
You'll string your beads onto the wire, then cut it leaving about 1/2" inch room for making a loop at each end of the wire, each end of the beads.
Get your chain ready, add clasps and O-rings as necessary.
Fit the chain around your wrist and determine where it needs clipped, if any. Use the cutting tool on pliers to snip. You can secure the open links back together using your pliers.
Since bracelets that're roomy tend to slide to the underside of the wrist, you want to be wary of that when making this one since the strand of beads need to face the outer side of your hand. So, I had to cut my chain shorter than I would for a normal bracelet.
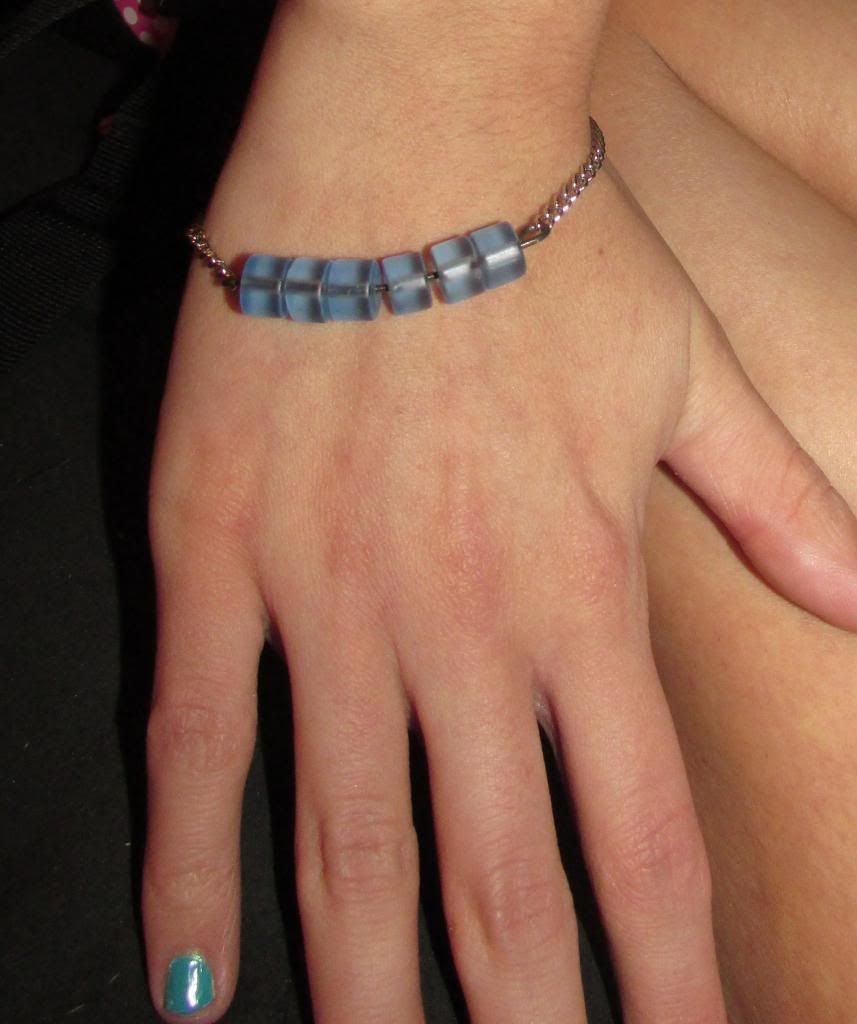
Now, take the strand of beads on the wire. If you haven't made your loops at each end of the wire, do so now using your plier tool. You can open the loops on the ends of the wire to secure them to the end of the chain.
These instructions are not extremely in-depth. If you need deeper instructions, shoot me a message & I'll come to the rescue right away. If you don't want to do that, do some online searching to learn how to use jewelry pliers, if that's the part you need help on.
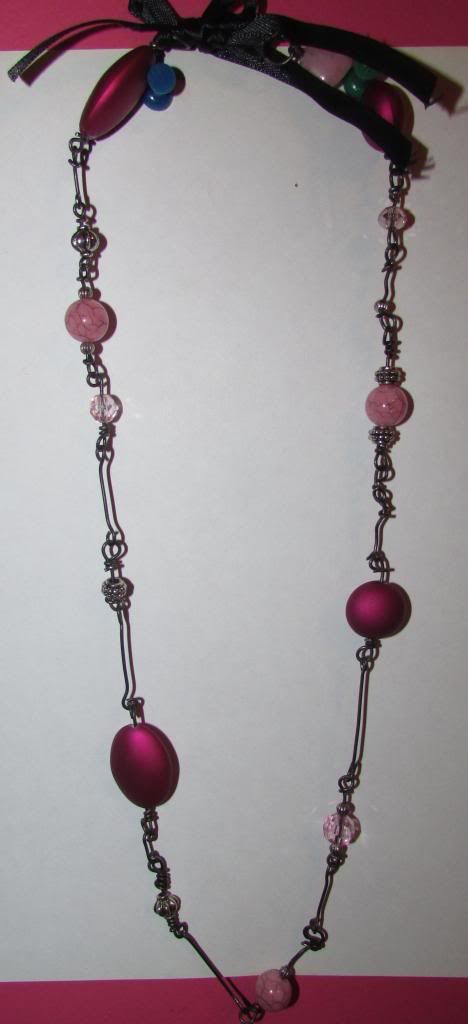
The necklace above was made using the following:
- One pack of the large, shiny but matte pink round and oval-shaped beads (comes with 2 strands) from Wal-mart.
-Steel annealed wire -- I bought a nice amount of this stuff off Amazon for like $5, although the price was listed as a dollar! That aside, I'm so glad I did because this stuff has been a life saver. I've truly been able to expand the designs of my jewelry using this stuff! Totally worth it.
The chain thingy was made by me using cut pieces of the wire and using my plier tools to shape and cut. It looks a bit rough up-close, but I'm happy with it. You can always be more precise with your wire-shaping, though. The beads were all also attached using this wire. No extra stuff was needed besides beads, ribbon and wire. It's so long that it fits over my head without the need of a clasp. The way I see it, if you don't need a clasp, no sense in wasting one!
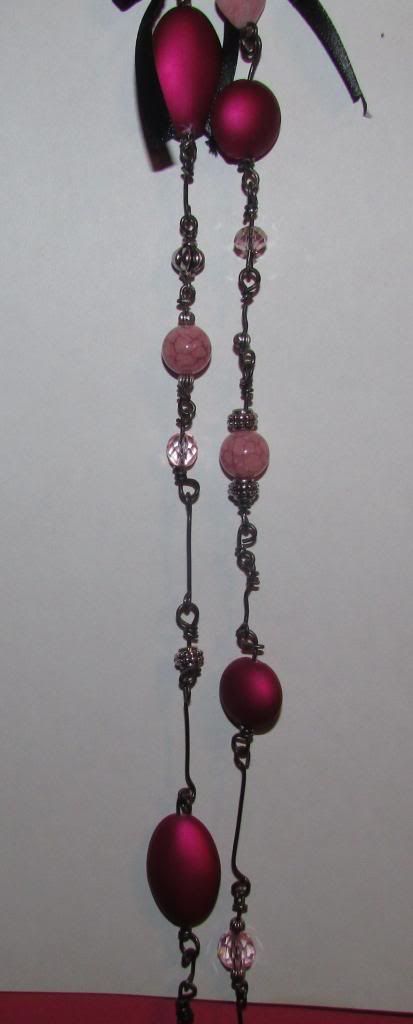
-The lighter pink colored beads as well as the clear-pink ones came in another $2 pack from Wal-Mart. I actually had these left over and even some left after making this necklace! The pack had a great supply of beads in it.
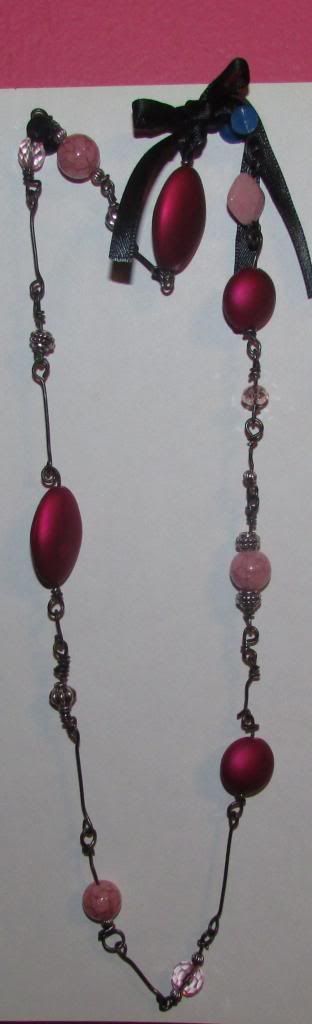
As for the ribbon, I basically just cut two pieces, folded each in half and tied them around each end of my wire loops (shaped using the tool and the wire.) Very easy project, but the wire twisting took some time and more patience than I had, which is why mine isn't so perfect looking.
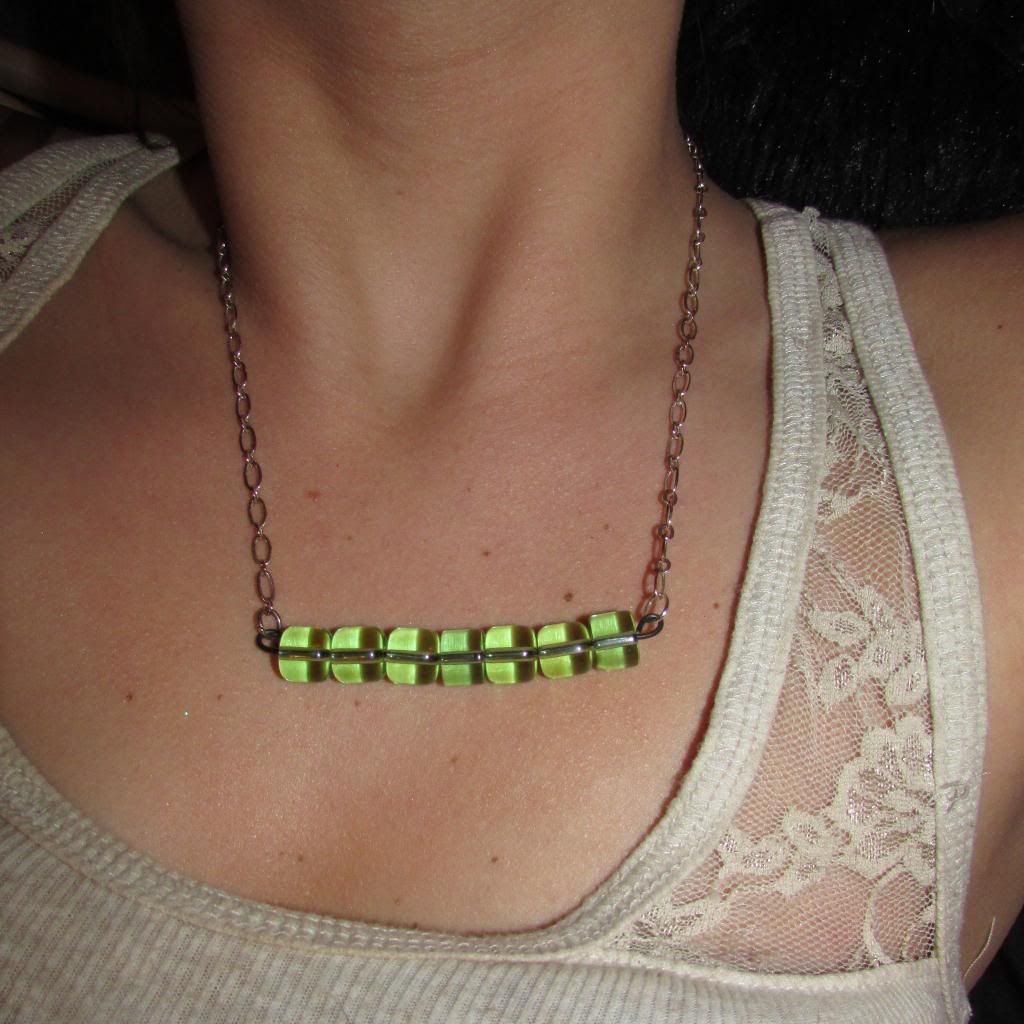 | |||||
| Necklace made using: |
- Old chain in my chain slot of bead stash.
- 7 Rounded, interesting shaped green glass beads found at Wal-Mart in the $2 bead station.
-And of course a clasp at the back, but if you make this necklace long enough to fit over your head, no clasp is really needed!

As you can see, this is a really easy, quick necklace to make & it looks nice and unique. Kind of a statement necklace. I had planned on using the other shapes in the pack (there were some teardrop shapes and smaller shapes like the ones in the photo.) I wanted to add them each on another stick of wire, one under the other, but once I got them all together, I just thought the simplicity of the one strand looked so much better for some reason. You could still do that though.
The blue glass bead bracelet I made previously is very similar to this. I basically used the same exact technique only a bracelet length instead of necklace.